I needed to make sprockets as templates for some lost foam casting I had in mind and like a lot of people I came across Matthias Wandel’s excellent Wood Gear Generator program. Matthias is the wood gears guru in my opinion and his program is easy and in part free. You can see it online on his website www.woodgears.ca/gear.
Unfortunately I needed sprockets and these are not part of the free version, but Matthias’s download version does cope with these and is very reasonably priced. Sprockets are similar in appearence to gears but they work in conjunction with a chain rather than another gear. Think of a bicycle, where the pedals meet the chain. That’s a sprocket.
The gear generator program allows the user to type in their required measurements and from this it produces a paper template. Matthias instructs us to cut out the template, glue it to a scrap of wood, drill out some holes, trim away the excess with a bandsaw then sand to finish. Now this is a great theory and I’m guessing it’s worked well for him and thousands of others – but not for me. Whether I used a lot or a little amount of glue, I invariably found that the template would tear apart throughout the process, leaving me with no guidelines. More critically I found that despite using his gear program correctly, my paper templates were never very accurate. I found my circles weren’t true so the measurements were off (whether this was my printer, the paper quality, the paper stretching with glue, etc, I’m not sure). As such I had a couple of unsuccessful builds that I certainly didn’t want to use as templates.
This meant I had to find another way…
To begin with you’ve got look at the template the gear program produces and to try to understand what’s going on.
This is one of the paper templates I printed. It prints to scale and also lists the critical dimensions and shows the points which need drilling out. Matthias certainly does a good job : ).
My sprocket had teeth that were 25mm apart with gap of 12mm between. This meant that the diameter of each tooth had to be 13mm.
Because of this I drew some additional lines onto the template. These lines dissected each tooth in two to provide a centre point to a 13mm circle which is the size of the each tooth. More about that later…
Amended sprocket template
If I’ve confused you by swapping sprockets, don’t be. The tooth and gap dimension are the same but the number of teeth is different. In other words both the sprockets you see on this page will run on the same chain.
With a template glued to a suitable piece of timber (I used MDF by plywood would be stronger and more durable), Matthias suggests using a bradawl to punch the marked drill centres on his templates ready to dill out material. The problem is using a bradawl to prone to mistake. A simple slip would easily mess things up. I guess I’m not as skilled as he is… plus the inaccuracies in the print meant I couldn’t rely on the positions of such points too much. So I decided to centre mark with a bradwal of my own.
A Drill Bradawl
I placed a simple panel pin my drill chuck, turned on my angle grinder and drill and by carefully bringing the two together I was able to make a very sharp metal bradawl pin for my drill press.
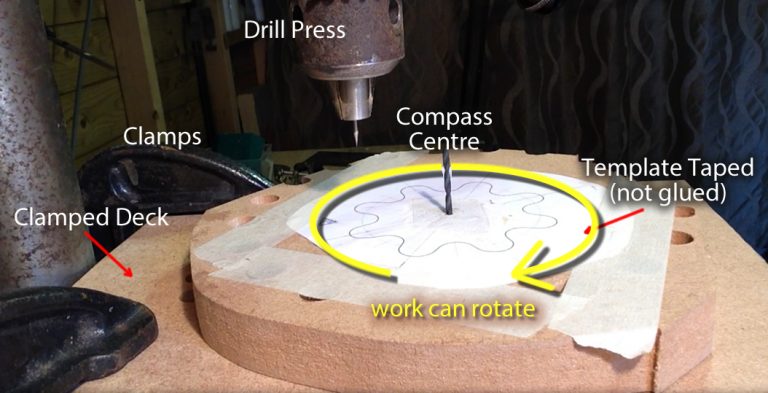
Compass Jig
I clamped a scrap of timber to the drill table. I carefully marked the centre of my sprocket-work, drilled a 2mm hole through the centre and drilled down a little further into the clamped wood (deck). With everything removed from the drill press, the 2mm drill is pushed into the sprocket and then into the deck – making a simple compass jig.
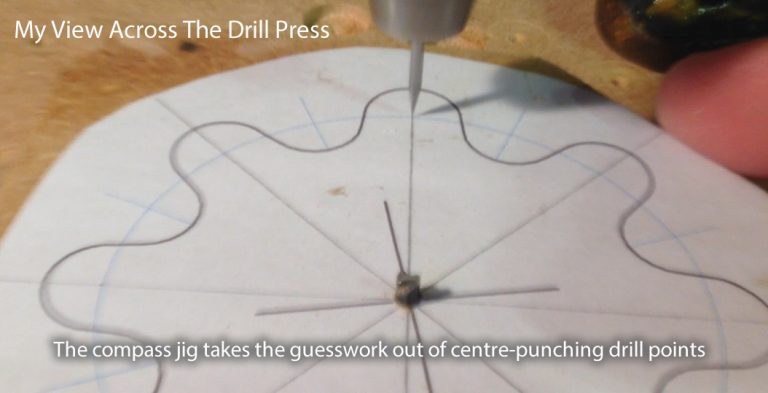
With careful adjustment I was able to position the point of my bradawl pin to be exactly on the one of the drilling points on the template. This meant that with the lightest of pressure I was able to mark a hole for drilling without fear of slipping. Turning the work on the compass jig meant that each subsequent mark I made was always going to be same distance from the centre and it made lining up these points much easier. Remember, it’s necessary to mark all the centre marks on the template, the ones for drilling and the ones that we add ourselves!
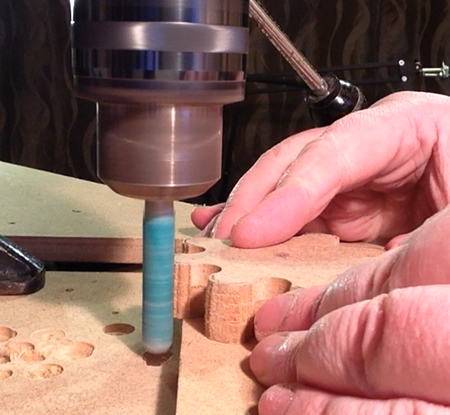
With the drilling points marked it was a simple matter of placing a 2mm drill bit into the press and boring out a few holes pilot. Obviously you only need to pilot drill the daps between the teeth (not the teeth themselves – even then we marked a centre point with the bradwal pin).
I removed the work and sanded the burs from the underside before adding a step drill to the chuck. This maxed at 12mm which is prefect for my needs here and it makes easy work of this process.
The drilling is easy and the technique simple… Apply very little pressure the work and gently lower the setp drill. The bit will try to align and centre itself on the pilot hole below – so let it. Once it engages the pilot hole, apply pressure to the work and drill deeper. Avoid doing too much in once go. That can lead to tear out on the underside. It’s better to drill part way, flip the work over, drill part way, flip the work over – and repeat… slowly is usually better.
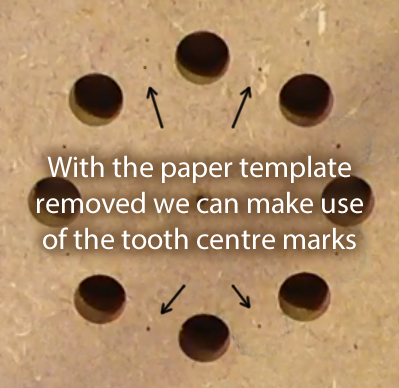
We can now discard the paper template (that’s why we taped it). If we glue it, it will rip anyway. But obviously this leaves us without guidelines…
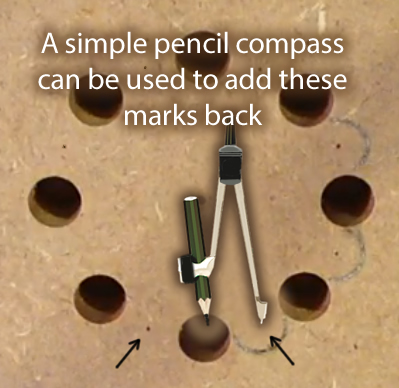
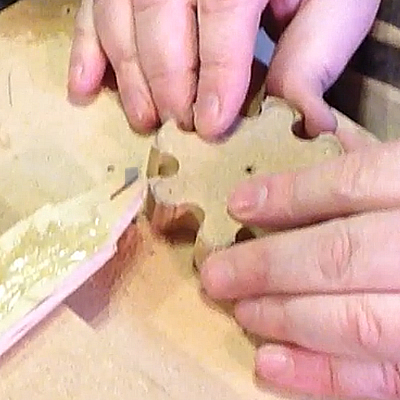
Thankfully we’ve marked the centres of each tooth with a bradawl. If you recall from above, the diameter of each tooth is 13mm. That means my using a pencil compass it’s possible to draw on pencil lines that form the shape of the teeth.
With that done it’s a matter of removing most of the material. A bandsaw is best for this but personally I use a jig saw. The trick is to not get too close to the pencile lines. Leave something to sand away. It’s surprising how precise you can be when sanding.
Jig Saw screwed under a board makes a useful Band Saw
Sanding To Shape
I don’t have a dedicated sander so I needed to make something to help me smooth everything. I had a small piece of steel bar lying around, so I cut a small slice of coarse sandpaper and using contact adhesive I was able to glue it to the bar. This made an excellent mini drum sander. With the sander in my drill press I was able to take my time and add the necessary shape to each tooth in turn. Having tried and failed on two previous occasions to build this wooden sprocket, I was pleased to finally crack it and I owe it all to the simple use of a jig. This enabled me to keep everything centred and circular.
Steel bar with glued sandpaper makes a nice drum sander
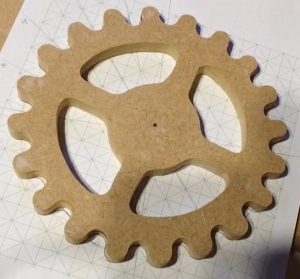
And that should do it. You should have a nicely centred, reasonably accurate sprocket.
Your sprockets or gears may be different dimension, but if you make a careful note of the dimensions and use a compass jig like this one, it will hopefully help you improve the accuracy.
If you want to see my YouTube video on the subject and see me doing this in real time, simply click below:
m8, You had best see to your health or your knowledge will be lost to the next generation. I'm glad you're making these videos, though!
“Remember that the happiest people are not those who are getting more, but those giving more” - H Jackson Brown JR.
If you'd like to offer a donation (and help me fund a few new projects), then please click the donate button below. Payments are handled securely by PayPal. For more information on why I have this button, click here.
Or... Become A Patron
Alternatively, if you can spare a little each month, consider becoming a Patron. Patron's make it possible for me to continue developing my YouTube Channel and my websites. Please CLICK HERE for more information.
 I needed to make sprockets as templates for some lost foam casting I had in mind and like a lot of people I came across Matthias Wandel’s excellent Wood Gear Generator program. Matthias is the wood gears guru in my opinion and his program is easy and in part free. You can see it online on his website www.woodgears.ca/gear.