Home made waste vegetable oil burner for a home foundry
Not long after I discovered the joys of melting metals at home in my home made foundry, I began to grumble at the cost and mess associated with charcoal, my fuel of choice at the time. I had plenty of waste vegetable oil on hand which I was collecting locally for free and I imagined it must be possible to heat a foundry with this – after all I was running my car on it. See the accompanying video here...
(WVO stands for Waste Vegetable Oil - ordinary cooking oil which I personally used. WMO stands for Waste Motor Oil - something I've been reliably informed by subscribers also works well in this simple burner)
I looked at YouTube for inspiration and I did find examples of exactly that – people melting metal with waste veg oil or even waste motor oil. But the burners all had one thing in common – a compressor. I didn’t have a compressor so I was somewhat disappointed. If you have one, then you'd probably be better looking elsewhere for inspiration, but if you don't... well, it occurred to me that maybe I didn’t need one after all.
How Veg Oil Burners Work
Veg oil doesn’t burn very well at all. Throw a lit match in a bucket of veg oil and you’ll extinguish the flame. But veg oil vapours burn more easily and that’s what these compressor designs were doing, they were putting the oil under pressure and spraying it in a fine mist. Do this onto a hot surface and your vapours will ignite.
My Veg Oil Foundry Burner Idea
Without a compressor, I wasn't certain how I could achieve this fine mist and it was whilst filtering some waste oil that inspiration struck. My filtration method involves trickling rather than pouring oil and as a tiny stream of oil dropped into my settling tank I blew it - not that hard either - quite a gentle breath. But this scattered the tiny stream into droplets and it was one of those eureka moments.
All I needed to do was trickle oil in front of a moving column of air and I could mist it.
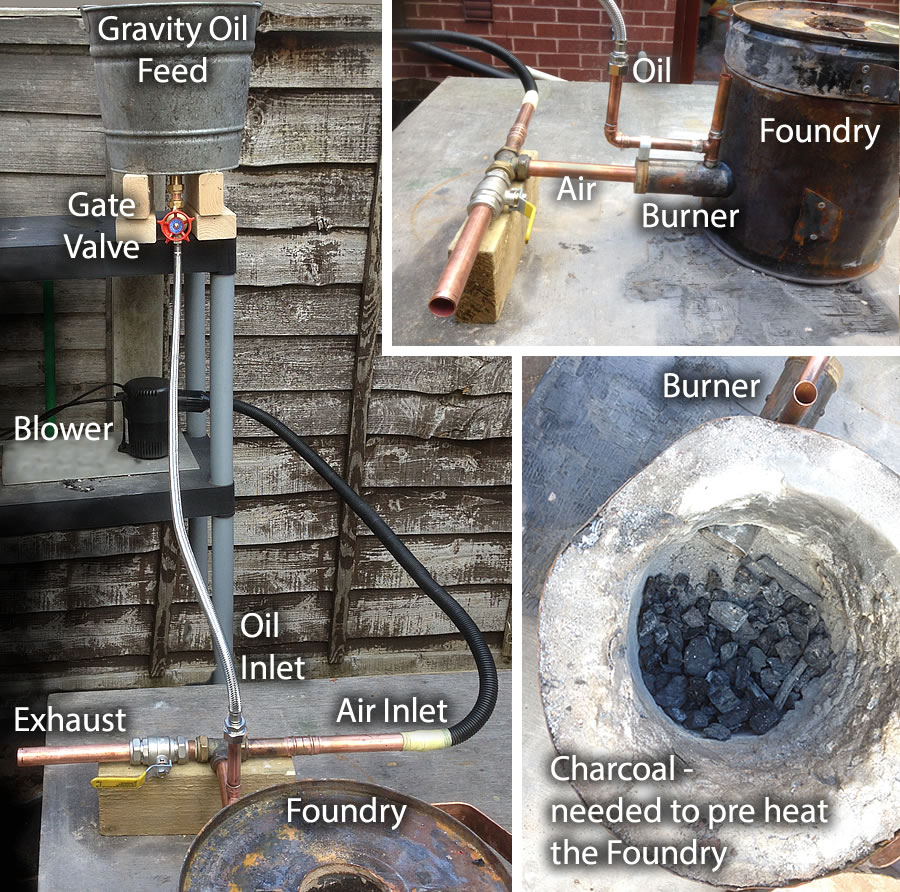
A Blower
With a quick rummage around my shed I found a small blower, the sort that inflates air mattresses, kids' toys, that sort of thing. It was just what I was looking for.
If you haven't got such a blower, I later discovered a small, cheap, electric leaf blower on eBay and I shared this idea of using a leaf blower for an oil burner on YouTube.
Choosing A Blower
In that video I make an important point... you don't have to have the same blower as me. See what you've already got lying around or what you can buy cheaply.
You want something with a bit of guts, yes, but you haven't got to go mad. I think if it's powerful enough to inflate an ordinary party balloon, the sort of things you give to to kids to keep them quite for ten minutes, then it will work. Any weaker than that and it probably won't. But you do want something that will happily function for a good hour or more, so take that into account.
Too Much Air - Controlling The Flow
I discovered the hard way that air flow is very important. Just as too little air will achieve nothing, too much air will also result in failure. This means it's a good idea to make some kind of air control system. I came up with a very simple design which, whilst basic, has served me well.
A simple air control device based on the principle that air wants to travel in a straight line
This design is based on the simple premise that air wants to travel in a straight line. The tee allows for a change of direction and the quarter-turn valve after the tee adjust the ease with which the air flowing from the blower can travel nice and straight.
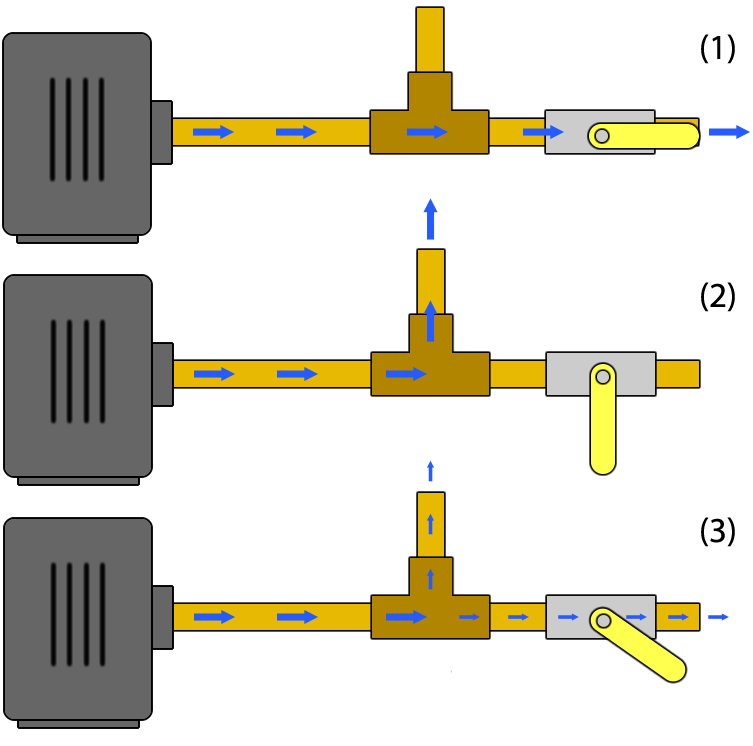
With the quarter-turn valve fully open (1) air travels easily in a straight line, going to the exhaust in our case.
However, if the quarter-turn valve is fully closed (2), air can no longer travel in a straight line and it has to take the path of least resistance, in this case blowing inside our foundry.
With the quarter-turn valve neither fully open or fully closed (3), there is resistance to air flowing in a straight line, so some will continue on into our foundry and so will pass out through the exhaust. By adjusting the quarter-turn valve, it's possible to adjust how much air goes into our foundry (which is very important) all without permanently blocking the blower which could, of course, damage it.
Thus an air controller can be built out of some simple plumbing parts. I used 22mm (3/4 inch) copper pipe and fittings, simply because I already had them. I would recommend investing in a good quarter-turn valve however. You want the good variation of flow and a smooth motion that cheap ones don't always give you.
Burner Design
By now you're probably getting the idea that this is a very basic and simple design set up - and you'd be right, that's the beauty of it. Other than the blower, there's nothing to go wrong.
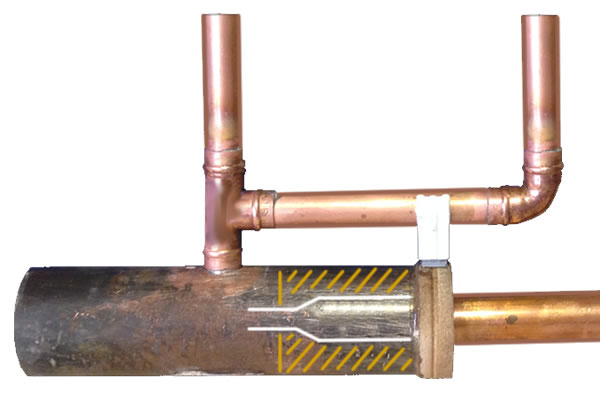
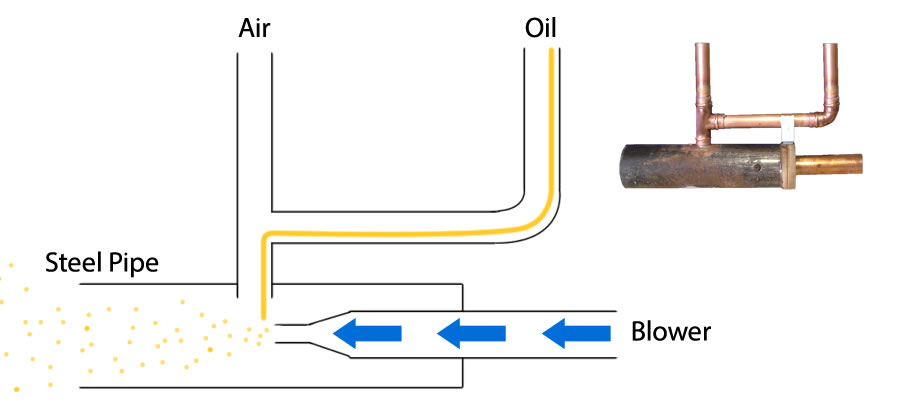
This is the design for the burner itself:
I must confess at this point, in my original oil burner video there was only one air inlet, the one from the blower. After advice (gratefully received) from others, I added the second air inlet in an amended burner video. I'll mention more about that later.
The main body of the burner is a steel pipe, roughly two inches (50mm) wide. Steel is best as it is strong and able to handle the high temperatures within the foundry.
Top centre is a small hole, in my case a 15mm (half inch) hole that corresponds with the size of standard UK copper pipe. Why copper? Well metal is probably best as there's potential for these to get hot but the choice of metal doesn't matter as much here. I just went with copper as I already had some to hand, plus it's fairly affordable.
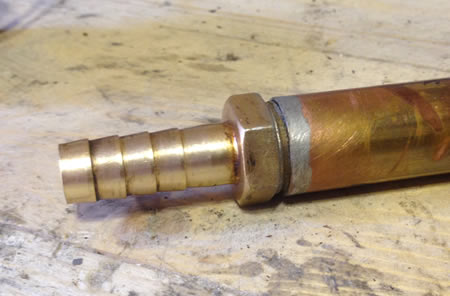
The blower pipe is also copper, in this case 22mm (3/4 inch). Inside the steel pipe, this air pipe reduces in size, narrowing and thereby concentrating the flow of air. I achieved this using a hopepipe attachments that I had lying around, though there are all manner of reducing fittings available.
A standard hosepipe fitting helps narrow the air inlet, concentrating flow
How The Burner Works
To function, oil is fed slowly into the top of the burner, so that it trickles in a narrow, thin stream inside the steel pipe. Just behind is the air inlet. The air flow is narrowed and concentrated increasing its power. This pushes through the stream of the oil and breaks the trickle into droplets, spitting these directly into the preheated foundry. It doesn't really become a mist of oil, as with compressors, but these droplets have proved good enough.
Control is critical. Too much oil will flood the piping and the foundry, quenching it. If the oil stream isn't fine enough it will not break up to form small droplets and spit. Similarly if air flow isn't sufficient droplets can't form, but strangely if the air is too powerful it doesn't work either. I haven't quite figured this one out to be honest but I continue to find that if the airflow is too powerful, it simply doesn't work, so controlling the air output is also necessary. No matter what you read elsewhere about air making for a hotter foundry, trust me here, build the air control... you'll thank me later.
Two Air Inlets?
I mentioned above that I redesigned the burner to have two air inlets. My original oil burner video had just the one though the blower I used was strong but not fast. At the suggestion of more experienced oil burners, the amended burner contained a second inlet to encourage more airflow using what's known as the Venturi Effect and it has to be said, with my original blower it worked a treat. Later on I purchased the leaf blower and whilst this was powerful it was also fast. Whether or not air speed is the issue I don't know, probably air force is more likely, but whatever the cause when using the leaf blower I originally had a terrible time until I realised air was pushing its way back in and out of the burner through this second inlet. That meant with the leaf blower the second air inlet had to be blocked off.
This may all sound a little confusing and it may continue to until you try it for yourself. At that point you'll truly appreciate the fine balance that's needed between air and oil flow, but for now I'd really recommend watching the two mentioned videos to get a better grasp of what I'm saying.
Controlling Oil Flow
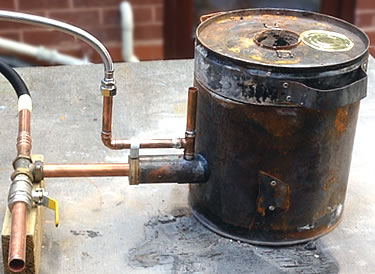
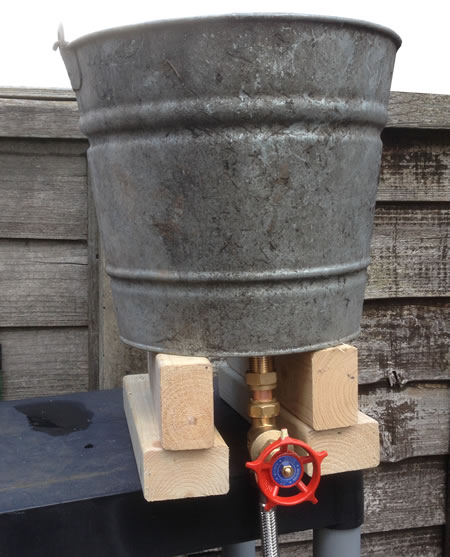
Oil is delivered into the system by gravity. This certainly saves on dealing with the complexities and expense of pumps, plus it means I was able to use an old metal bucket as a feed tank.
A simple tank connector is fitted to the bottom of the bucket and this couples to a Gate Valve. It's certainly worth spending some money on a quality Gate Valve. This is effectively a faucet. Poor quality gate valves often give poor control but if your valves up to the job you'll discovers just how little oil you can allow into the system, and that's the aim here. If you situate your feed tank (bucket) three or four feet above the burner, don't be surprised if it takes a good ten seconds for the oil to come through - that's how little and how slow we want the flow. A trickle!
Construction
Building the burner is fairly simple. It's mainly a matter of slotting together whatever materials you've found for the purpose.
Good quality adhesive will hold the hosepipe attachment to the air inlet pipe, but this then needs to be suspended in the centre of the steel pipe. I used a hole saw to cut a wooden circle from a scrap of MDF and in the centre of this I drilled a hole the same diameter as my copper pipe. I glued the pipe within the MDF and glued the MDF to one end of the steel pipe. This pretty much fixed the air inlet pipe in place.
However as a precaution, I mixed some plaster and sand together and poured this inside the steel pipe - not all the way - just enough to surround the inlet pipe without blocking its exit. This only took minutes to dry but overnight is generally best.
The copper pipes were cut to length and a single pipe clip screwed carefully into the MDF held these in pipe.
The Set Up
I connected my oil supply to the burner with a flexible hose. This is designed for domestic plumbing so it had compression fittings on either end making this very simple. It also had a stainless steel coating which helps protect the interior, whatever soft flexible material it may be, from melting, though I tend to drape a cool, damp cloth over the air and oil pipes during use - just in case.
My blower had a plastic pipe that I could slide over my air control system and I secured this in place with some tape. The exhaust pipe pointed away from the Foundry and the other air outlet was connected to the burner. The burner is then slid into the foundry.
Pre Heating
Put a lit match anywhere near the burner at this stage and even if everything is connected and working, all you'd get is a soggy match. The oil won't burn unless the foundry is hot, so we still need to preheat it with Charcoal or wood. Thankfully we don't need very much.
Light the fuel and let it get going. Then you can turn on the blower (no oil yet). Adjust the flow to blow gently at first and gradually increase until the foundry is hot... hot enough that the charcoal is glowing white. Now is the time to introduce the oil.
Get The Balance Right
Open the gate valve to the oil very slightly. I think on my valve it's about a quarter of a turn but yours may be different. Don't let it gush or the oil will flood in and put out your fire. You're aiming for a trickle of oil, no more than that.
Don't blast the air either. I really can't say how much as your blower / pipes / set up is bound to be different to mine and you've got to figure this bit out for yourself. But give it a minute or so for the oil to reach the foundry and listen.
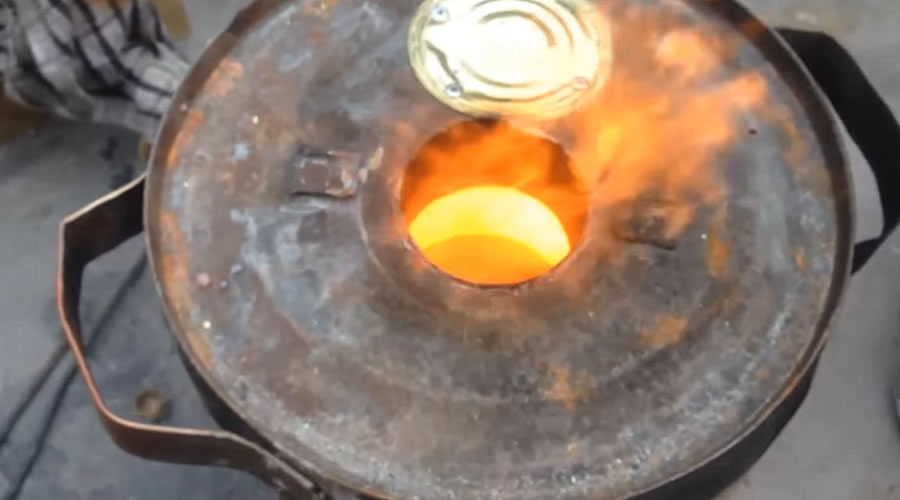
Whoomph
You'll know when the oil spits onto the hot foundry. You hear a whoomph, a little like the sound of an old fashioned pulse jet. It's sort of a deep cough.
Slowly, very slowly, increase your air and your coughs should get more regular until they become a constant groan. If you add too too air, you'll lose it and too little just won't do it, but when you get it just right, you'll have environmentally friendly fuel that packs a punch.
When working optimally there shouldn't be any smoke or smell. If it is smoking, the foundry probably isn't hot enough to properly burn the oil.
The power of this little burner amazes me and if your foundry is well insulated you'll have no trouble obtaining temperatures high enough to melt copper (I know, I have) though steel isn't as likely - but who knows. I've never tried steel and can't really see any reason to but if you try it and have success, let me know.
Feedback
Feedback on this little burner has been very positive. It is fiddly to get going but like all things once you've done it it gets easier and I've heard from folks who've had great success. I've even had people say how they've adapted the idea to heat their workshops etc and some say in well insulated foundrys they're melting iron.
With this project more so than others I think it's worth watching the video. The description above just doesn't do justice to the simplicity and ease of this oil burner.
“Never surpress a generous thought” - Camilia E Kamball
If you'd like to offer a donation (and help me fund a few new projects), then please click the donate button below. Payments are handled securely by PayPal. For more information on why I have this button, click here.
Or... Become A Patron
Alternatively, if you can spare a little each month, consider becoming a Patron. Patron's make it possible for me to continue developing my YouTube Channel and my websites. Please CLICK HERE for more information.
 Not long after I discovered the joys of melting metals at home in my home made foundry, I began to grumble at the cost and mess associated with charcoal, my fuel of choice at the time. I had plenty of waste vegetable oil on hand which I was collecting locally for free and I imagined it must be possible to heat a foundry with this – after all I was running my car on it. See the accompanying video here...
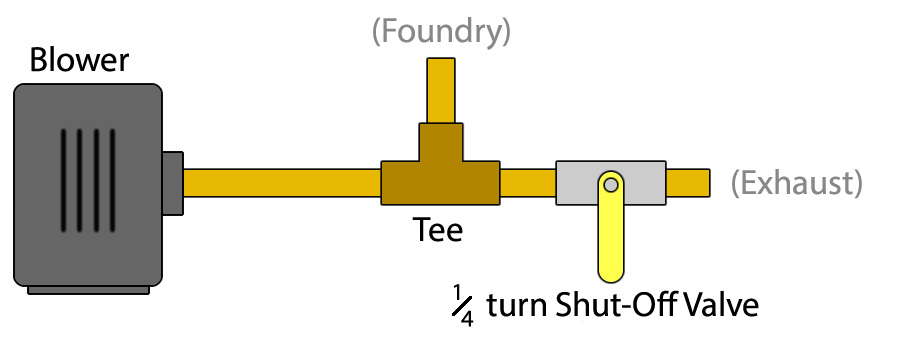
 Oil is delivered into the system by gravity. This certainly saves on dealing with the complexities and expense of pumps, plus it means I was able to use an old metal bucket as a feed tank.