During a project, I found I needed to make a few hundred cuts from aluminium channel. As I needed good accuracy, I knew doing it by hacksaw or even manually with the angle grinder would not yield the results I needed. A metal chop saw would have been perfect, but at a few hundred pounds this was out of the question. So I considered a stand for my trusty grinder.
I could have bought an off-the-shelf angle grinder stand, but I’ve had poor experiences of them in the past. So I looked to YouTube but most of the stands I found there were either made of metal or a bit too complex. This left me having to come up with something simple – easy to build, cheap materials, accurate and achievable quickly.
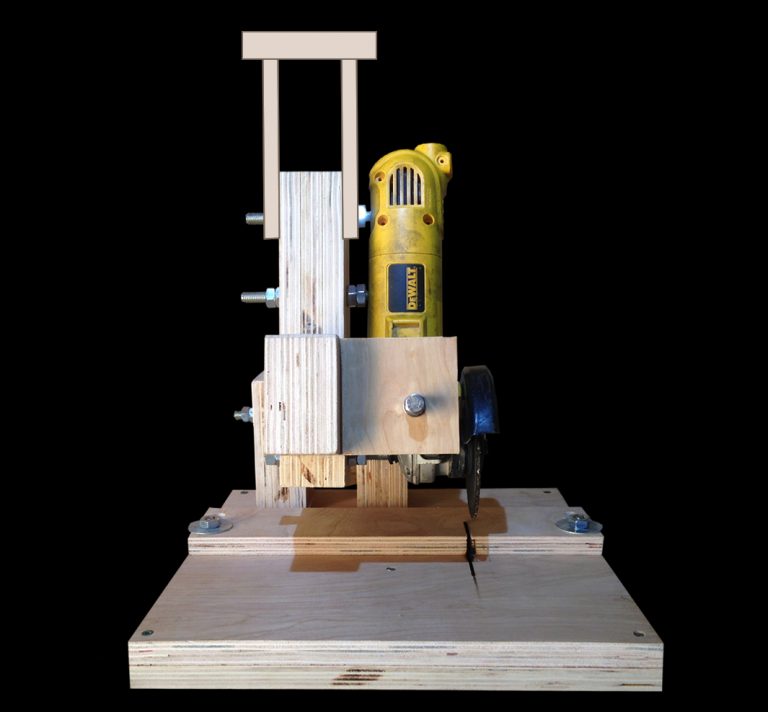
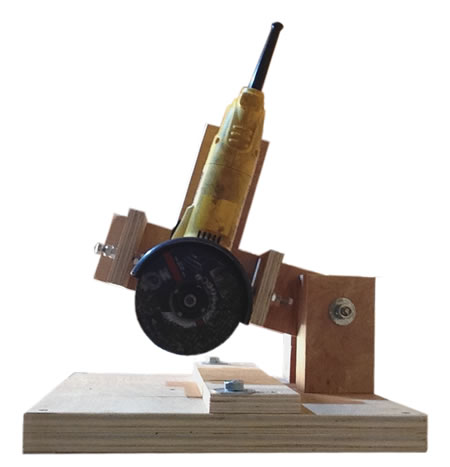
So I came up with this really easy-build plywood stand. It’s appearance is bulky, yes, but it works great!
This stand is for a small angle grinder (4.5 inch / 110 mm), though you could apply this design to a larger grinder too.
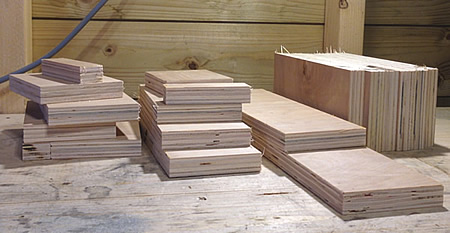
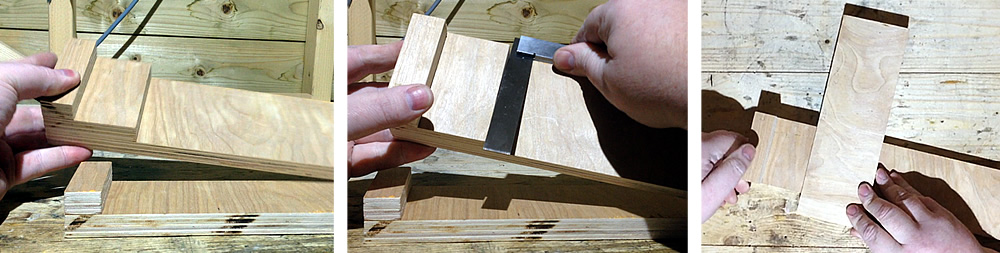
After measuring my grinder, I took a plywood off-cut and ran it down into thin strips. I then cut these strips into smaller sections and if you’re interested in the measurements you can open up the cutting list below.
FREE PLANS - DOWNLOAD HERE
I've created some free plans to go along with this build. These files are created using Adobe Acrobat Reader which most browsers should already be happy to view, though you may need to download Adobe Reader is you can't view them. It that's the case, just click here (Adobe is a reliable, free service).
Both Metric and Imperial measurements are shown on the plans. However, you should pick one unit of measure and stick to it as the plans have been devised on a best-fit basis... you've been warned.
Instructions : Just click the relevant link above. Any problems, get it touch. Enjoy!
Donations -
“No act of kindness, no matter how small, is ever wasted” - Aesop
If you'd like to offer a donation (and help me fund a few new projects), then please click the donate button below. Payments are handled securely by PayPal. For more information on why I have this button, click here.
This job really is just a case of gluing and clamping these bits together. Just use good glue, line everything up carefully, nice and square, and don’t rush the process. It’s better to work in small batches as you’ll see.
Sections cut ready for gluing
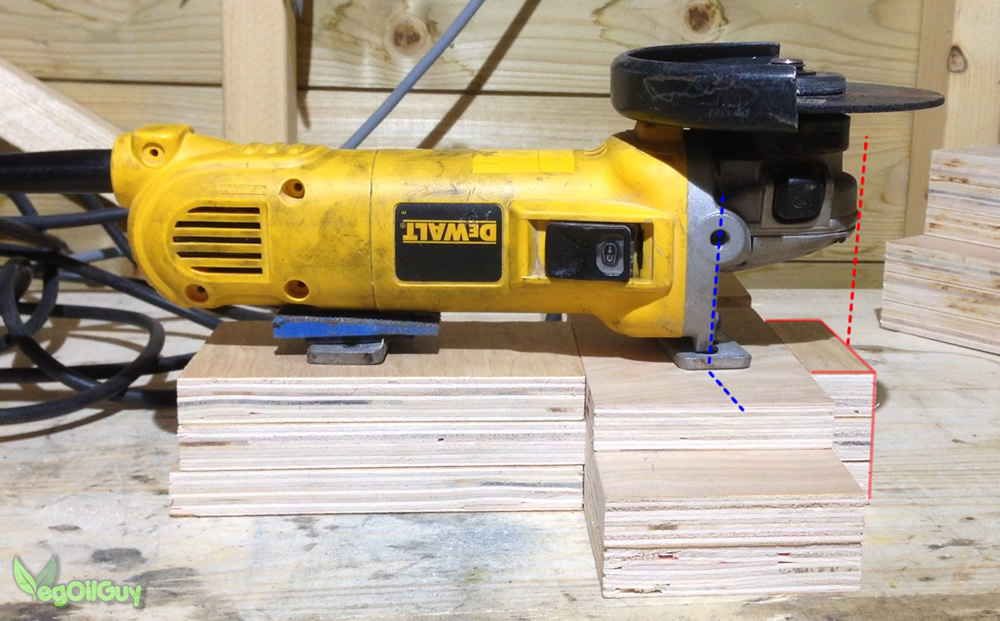
Mine is a DeWalt Angle Grinder, but don’t be too concerned if your grinder isn’t the same. The dimensions I’ve provided should leave enough material here for you to be able to adapt the design to match your needs. Actually because it’s hard to be exact when dealing with plywood (when was the last time 18mm plywood measured 18mm? This lot measured 16.5mm) trimming the ends is likely to be essential.
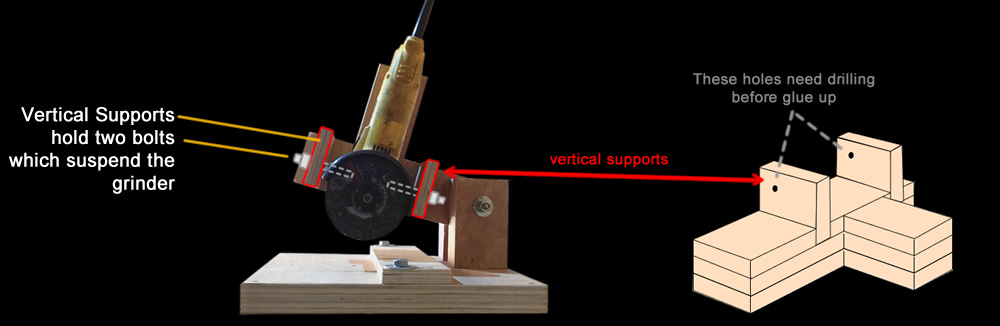
Before you tackle gluing all the parts together, there’s a few holes you need to drill first. This is important and you’ll kick yourself if you neglect this step.
Vertical Supports
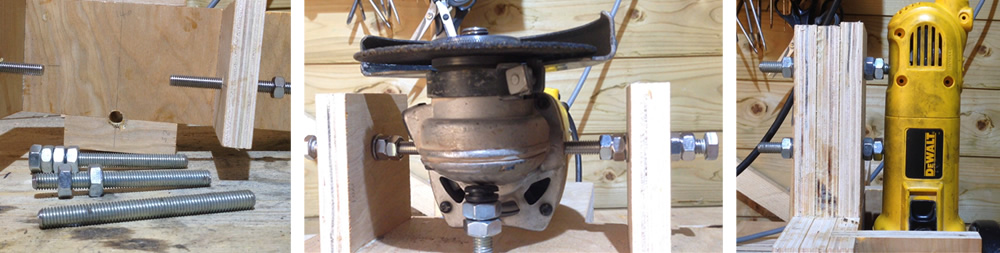
The grinder is supported by a couple of verticals using bolts that screw into the fixing points of the grinder’s handles.
To calculate where these bolts will pass through the verticals, it’s best to dry fit everything together and place the grinder in its final location. Use some shims to align it horizontally and evenly over its future support.
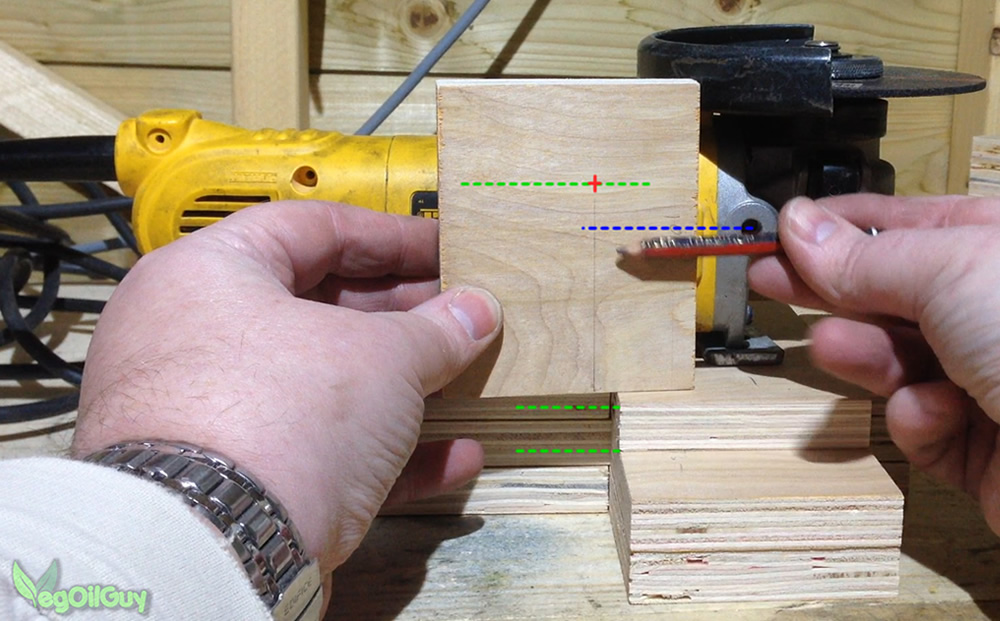
Locating Drilling Points – Vertical Axis
Note the position of the front of the grinder in relation to the front on the support (red line). Then mark downwards from the centre of the handle fixing point. That’s one axis sorted.
Locating Drilling Points – Horizontal Axis
Now offer one of the verticals to the side of this same fixing point and mark the horizontal axis. Remember here that this vertical piece is effectively rebated into to support arm during glue up, so you’ll need to add the depth of the plywood to your measurements.
Once you’ve figured out where these holes go, drill both supports simultaneously to ensure they match both sides. The thread on my handles is an M8 so I drilled holes to match. Make sure you do the same… Slack holes will cause inaccuracy.
Glue Up Method
When it comes to gluing, it’s best to work in small sections. This helps you concentrate on keeping things nice and square. Concentrate in the central region where overlapping takes place. As I said above, trimming will take place on the ends anyway.
Glue up in small sections. It helps keep things square.
If you try and do too much in one go, you’ll find the plywood will squirm beneath the pressure of the clamps and everything will slip out of alignment.
Two layers glued and screw points predrilled
At this stage you can see I’ve glued two layers and I’ve also pre-drilled some holes where the verticals will fit. It’s best to use good wood screws to add strength to each vertical. After all, it will be supporting your angle grinder.
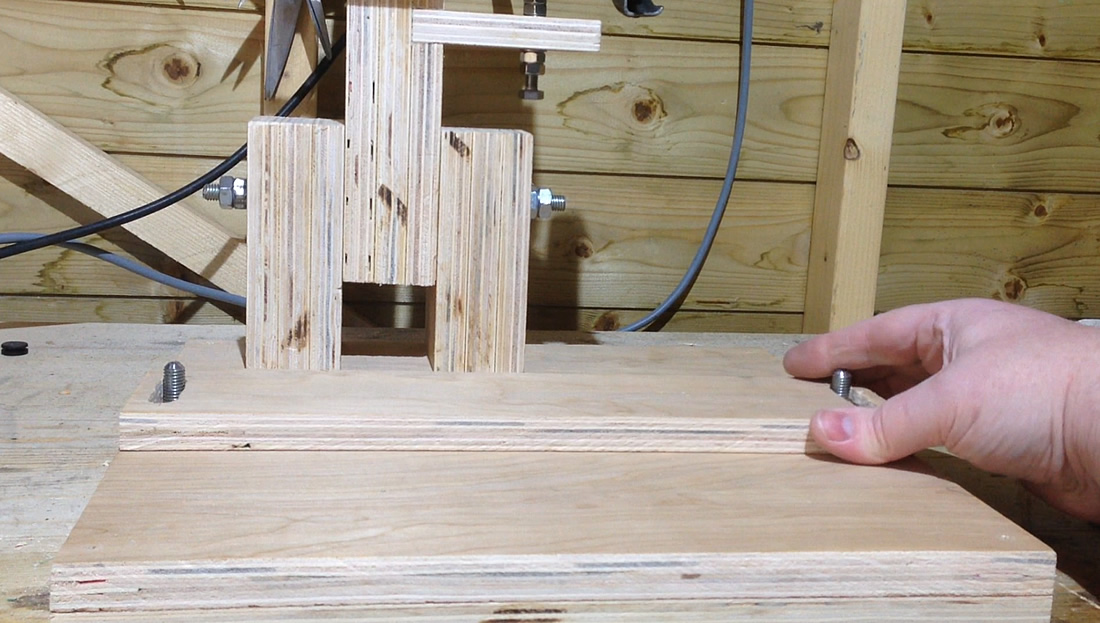
Centre Bolts
Once the frame was fully glued and dried, I test fitted my grinder and found the body of the grinder wasn’t quite central to body of the support frame, so I marked an appropriate centre line.
Along this line three holes need to be drilled. These bolts hold the grinder in the stand by offering horizontal pressure – so they provide the alignment adjustment as well.
With the grinder in the stand, look for the best spots on the grinder body for these bolts to push against. One at the front and two at the rear is the norm and you need to drill holes for these along the centre line.
I had some M10 threaded rod lying around but you could use whatever you like for this. If you have M8, M12 or whatever size bolts to hand, that’s fine. Much bigger is overkill really and much smaller might not be long enough. I cut three 4-inch (100mm) sections and this worked well. These push – without slack – through the drilled holes (avoid oversized holes – this will cause wobble).
Each support bolt has two nuts on either end. The second nut is tightened onto the first and this ‘locks’ them in place and secures them in position. It’s an excellent method that doesn’t shake loose with vibration.
I found some grommets and thought I’d use them as end caps for the bolts but in truth there wasn’t room. You could use felt or similar soft material, though I’ve found that as long as the tops are smooth there’s no problem.
With a bit of careful adjustment it’s possible to use these three bolts to position the grinder nice and vertical. It’s surprising how well this clamps the grinder in place.
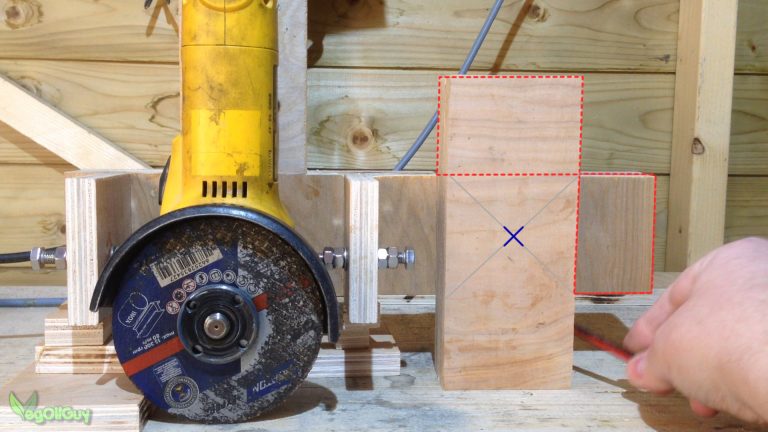
With the grinder in its support frame, I was then able to work out where the axel supports can be positioned. Leave a little room for the adjustment bolts then cut away the excess.
To help me drill the holes in the axel stands, I set up a simple jig of my drill press. If your axel is crooked then it will never cut true, some this was a worthwhile time investment.
I cut an 8 inch length of threaded rod to use as the axel. Make sure the holes you drill match the axel perfectly. Any slack will ruin cutting accuracy.
Large washers and a couple of nuts hold everything in place.
Trimming
I know I keep going on about trimming but I guarantee you’ll look at the ends of your stand and grumble things don’t line up nicely. Don’t blame me, blame plywood inaccuracies. But regardless, now is a good time to look over your grinder within the frame and see if there’s anything that can be thinned out and trimmed down. It’s not strictly necessary but it helps in appearance. After that it’s time for final assemble.
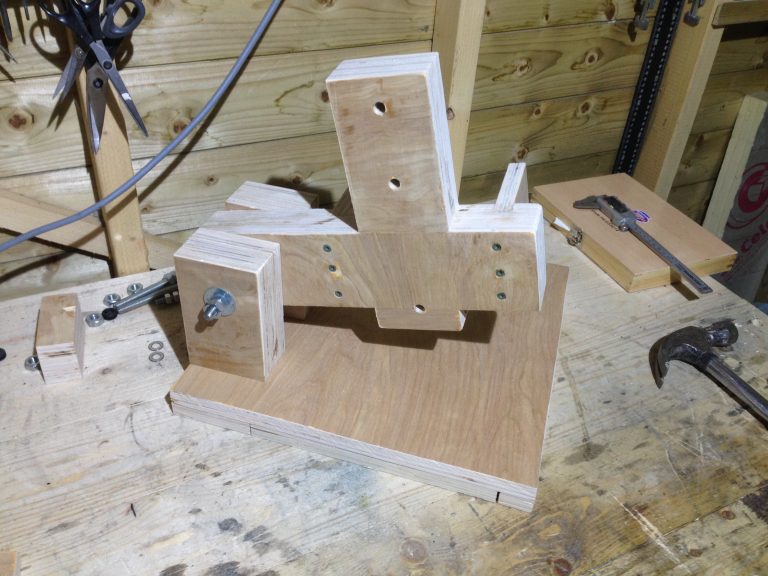
Base
I cut a fourteen inch square base from the same plywood and doubled up around the edges with off-cuts for strength.
I then screwed the axel supports from underneath. Don’t use glue. If your stands are slightly out of alignment you may be able to shim them to improve accuracy.
You’ll also notice the axel placement is set of to the left. That’s to keep the blade of the grinder more central to the stand.
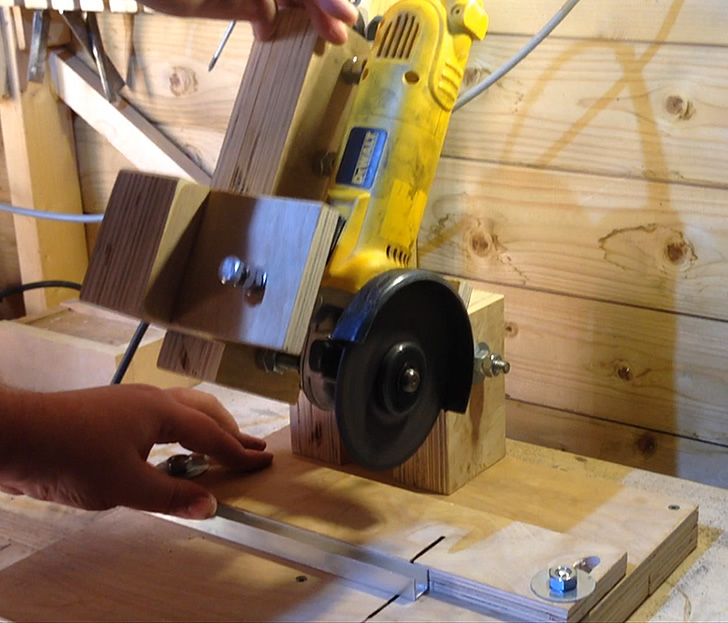
A fence is always useful so I drilled a couple of holes either side, added a small section of threaded rod, then cut slots in a length of plywood. Nuts clamp the fence nicely in place. Even finger tight seems to work well.
Easily Adjustable Fence
And that pretty much finishes the stand off
Adjustment
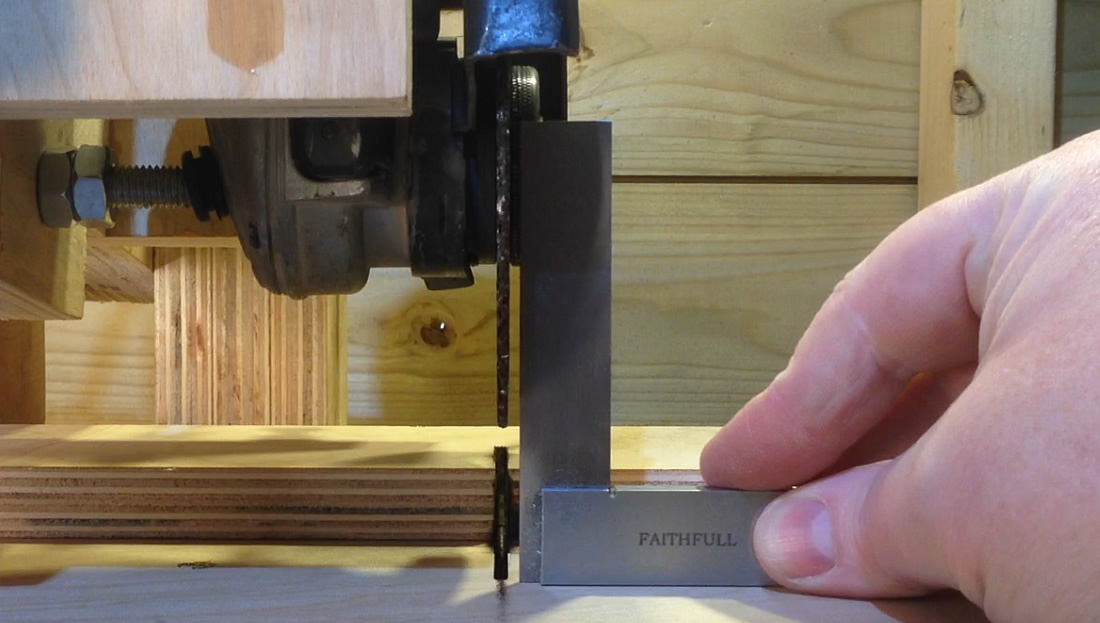
You’ll need to make sure your grinder blade is 90 degrees to the base to get nice square cuts. Now is the time to fiddle with those three bolts. Slack out the centre one and use the top and bottom bolts to toe in or toe out to your pleasure. When you’re spot on, bring in the centre bolt for moral support and tighten all the ‘second’ nuts against their partners to prevent anything coming loose with use.
Careful adjustment yields square cuts
After spending several minutes making sure the blade was square to the base, I let the blade cut a grove in the base and fence. Cutting wood is not ideal and you’ll smell burning, so have a window open. But now you know precisely where your blade will fall.
You’re finished and your angle grinder stand will help you make nice straight, square cuts every time.
Nice square cuts EVERY time
Additional Points
Couple of points to finish this.
Firstly, one size does not fit all, so you may have to adjust your stand a little. Trim off any pieces that are too long or that you feel aren’t necessary.
Secondly, it’s worth adding a handle for convenience. This is a personal choice and I’ll leave that to you.
Thirdly, if you can screw or clamp the base in place. My workbench is far from flat so I had to shim one corner. I also found the plywood base bulged a little in the centre, so a screw helped flatten this a treat.
Finally, for safety it’s a good idea to fit a strong spring or bungee cord to the rear of the stand to encourage the grinder to return to an upright position. This reduces the risk of it dropping down accidentally on your hands.
Maintenance
Keep an eye on your bolts, ensuring they are nice and tight and your grinder is good and firm.
I found that if I didn’t use the grinder stand for a week or two it became stiff. This was easily resolved by slacking off the stand nuts and oiling near the pivot. I know the idea of oiling wood sounds strange, but it does work. Give the arm several movements until it feels just right, then retighten the nut – but not too much or you’re back to square one.
UPDATE - Safety Issues
Obviously angle grinders and wood are not ideal companions. Grinders spin at high speed and rely on friction – and that’s a perfect way to generate fire. In use I’ve found no problems with the base, but the fence can take a battering, especially if cutting hard metals on a prolonged basis. I’ve found the combination of sparks, friction, air and dry wood can quickly lead to a fence that’s glowing red! Whilst it’s tiny and whilst Bear Grylls would assure us that making fire is NOT easy, all the ingredients are here for an unpleasant episode.
So be aware of this. Don’t throw buckets of water on your electric grinder or you’ll create even more problems, but simply ease off the cutting a short while and let the ember fizzle out. Scrape away and charred wood then carry on. Use a damp cloth on the ember if necessary.
If you need to cut a lot of hard metals, it might be worth investing in a metal fence…
Very informative. Lots of good information. Thanks for sharing.
“Being generous of spirit is a wonderful way to live” - Pete Seeger
If you'd like to offer a donation (and help me fund a few new projects), then please click the donate button below. Payments are handled securely by PayPal. For more information on why I have this button, click here.
Or... Become A Patron
Alternatively, if you can spare a little each month, consider becoming a Patron. Patron's make it possible for me to continue developing my YouTube Channel and my websites. Please CLICK HERE for more information.
 During a project, I found I needed to make a few hundred cuts from aluminium channel. As I needed good accuracy, I knew doing it by hacksaw or even manually with the angle grinder would not yield the results I needed. A metal chop saw would have been perfect, but at a few hundred pounds this was out of the question. So I considered a stand for my trusty grinder.